Thursday, 29 March 2012

Marking over Easter

All sketchbooks need to be handed in today so I can look at them, make sure that they contain all the relevant images from the photographers that you have looked at, at least 6 images from each, and a total of 6 photographers are required for the studio work you did.
Produce a list of all the sessions we did and write an evaluation to include all of them from animation and photography you did.
The David Hockney research work in images and videos needs to be included in your evaluation all the way back to the first sessions that we did on 2D flat animation.

Anyone who hasn't completed or finished all their work properly will not be doing an FMP as you will be finishing this work off. So its up to go over all of your work to make sure everything is done.

Look at the tutor site, the criteria and the assignment papers on there to make sure and check all your work with.

Tuesday, 27 March 2012

What is an evaluation?

It must include you comparing and contrasting your work against your research, all your thoughts and ideas, what went well, what did you struggle with. What would you do next time that would improve what you have done.

What part of each area did you enjoy the most and why, did you like animation or did you prefer photography. Explain this in detail, you need to write the same as one sheet of A4 paper and preferably more for each evaluation.

Also you need to make sure that you include each lesson that you did to help you to write the evaluation.
You need to write one for animation and another for photography by this Thursday which is the final hand in day.

Thursday, 22 March 2012

Evaluations and final hand in day

Can you all make sure that all of your work is handed in next week, all sketchbooks need to be here. All blog work work needs to be finished as well.
All of the work for both units will be marked and graded over Easter. A final evaluation for photography and another seperate one will need to be done for the animation that you have done.
Check the tutor support website in order to make sure that you have read the assignment papers and produced work to meet all of the required criteria.

I have offered everyone the chance to gather any missing images over the last few weeks so everybody should have everything that they need to complete this course.

After the Easter break you will be working on your FMP projects as discussed with Lance, all time will be devoted to this after Easter and preparations should be made as regards you intended ideas as they need to be written into your proposals.

Monday, 12 March 2012

3 weeks left before Easter break

From now on on this course you have 3 weeks left to finish off any aspect of your work. That will include making sure that you have all completed making an animation video.
Also have you made sure that you have all completed your studio portraits and finished them in photoshop.

Then it will be the easter break, after which you will all be specializing in one area of your choice, photography, graphics or animation or a combination of these.
All of you have enough studio images that you have taken, so should be able to finish off your blogs regarding this work.

Also the studio photography that you have done will need finishing off in photoshop, we will do this on Thursday's sessions.

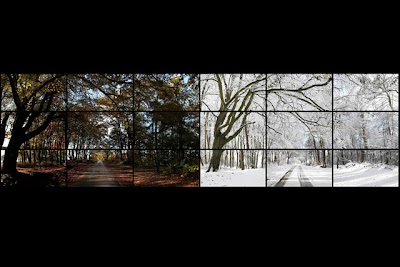
The arrival of spring theme we did for the last few sessions needs finishing off as well, again the triptych images will be layered together on a Thursday when we do the photoshop sessions as we did with the Hockney images.

Finishing off what is required is vital in order to pass this course and must be done, I will be going through with each of you on Thursday what you need to do in order to pass and finish this course and the work you are doing for me.

Today I want you to take images for any area that you feel you haven't done properly and then these images will be used in the Thursday class to finish in photoshop.

You all have to focus more on research to support what you are doing as this is to give you ideas and inspiration, if this isn't happening then the photography and animation work becomes difficult to understand.
Use today fully to concentrate and either do stop frame photography, animation images in order to help you finish these units properly before Easter.

Thursday, 1 March 2012

Apple iPad Art Exhibition in London

David Hockney - Arrival of Spring


The 'arrival of spring' photography that we did on tuesday was in response to the work of David Hockney as we discussed. The exhibition at The Royal Academy of Arts from January until April.

He worked on this project with paint, photography, ipads and video so you will need to look into these areas when you do your research.

The images that you took of '6 different  areas with 6 images' in each area will need to be placed alongside each other (in a similar way to his work and how its arranged within the exhibition).

Can you sort out sets of 6 images off the front computer and put them into photoshop, I will show you how to place the images together in a block of 6 within photoshop document.

The whole point of this is that is 'stop frame photography' in a series, the gap between each shot can vary in time, and as Hockney, did space the project out over different seasons. The stop frame photography that you have done has to include people in one form or another in some scale or size within the shots.

They may be positioned in one image or across the scene, or be walking across as the pictures are taken that would be a creative way to resolve this assignment.

If the weather is good we will go out as a large group to do some photography over the washlands as the most important aspect of this type of photography is that it is done in a creative way.
We may (if there are enough cameras) set up 6 cameras on tripods altogether in an area and do a large version to see if it will work on a larger scale.
With this you could end up with 6 stop frame movies all joined together depending on how complex you wanted to make your work.

Thursday, 23 February 2012

Stop frame final cut editing

For this session can you get your images from the front computer and add these onto your desktop, then open final cut and import your images into the software.
Place only the images on the timeline that you need, you may choose to add an effect or alter the sound with music or audio effects of your choice or off the Internet.

The final cut video will then need to be exported and then uploaded onto your blogs, then you need to write about what you did, what kit you used to do it, how well did it go, what would you do differently next time to improve it.

Then when you have done that you need to be doing research of stop frame photography on YouTube and on the web. Then you need to write about what you like about each video that you have added onto your blog.

These videos will then give you ideas for your own versions that you need to do with the digital Canon 450d cameras.

Monday, 20 February 2012

Links for Stop Frame Photography

Now we are back after half term you are now doing a new assignment about Stop Frame Photography on location. This is where you will involve people and objects within a series of still photographic images that you take on a normal digital SLR camera.
The assignment paper is on this site in full and will explain what you need to do so please read it. The photographs that you take will need to have a clear theme and be shot entirely on location.

Plan and prepare where you intend to go, make sure that you have the right person or people with you to do the shoot, and above all put some thought into the objects, outfits and props that people will use and this will make all the difference to the final images and movie that you create.

Try to be creative with the locations and get them to fit the style and theme of your shoot, do them near your home or on a day out somewhere to make them as interesting and original as possible.

http://www.youtube.com/watch?v=2_HXUhShhmY

http://www.youtube.com/watch?v=mwX7uEiEWx4&feature=related

plus look into music videos as there are many that have been shot in this format.


Design / Learning Cycle


The research that you do fits the ‘Design Cycle Model’ this is a cyclic event where continual evaluation takes place.
You may start with the ‘Design Stage’ and plan what you wish to explore based on inspirations from your research. Then the idea will enter the ‘Development Stage’ where the whole concept, theme, resources and equipment required will be considered.

The ‘Implementation Stage’ is where the actual photography will take place in a practical way. And the ‘Analysis Stage’ is where you can reflect back on how well the outcome has met the initial thoughts and ideas.

All the way through all of these stages you will be continually evaluating how well your project is evolving. This takes the form of a reflective process where you will consider what went well, what you think needs improving and what you would do differently next time. 

The areas identified can then be rectified, and so you will go round the cycle again repeating the same process hopefully in an upward spiral raising the level of your work each time.

You are also expected to compare your work against that of your research to see how well you have done and to help you final evaluate your work.

The whole point of research is to examine the images of photographers who are renowned in their own particular field or genre. The analysis or deconstruction of these images is very valuable and will enable you to add value to your own work.

The main key words you can use to identify the value from the photographs are;

Composition, Colour, Shapes, Patterns, Lines, Tonal Range, Frames, Rule of thirds, Texture, Form, Focal Point, Perspective, Scale,  Denotation, Connotation, (literal and implied meanings).

Monday, 30 January 2012

Edmodo system and Photography


The session today is fully explained on the lesson plans for photography tab on this website.


The following web link will be used for this session


http://www.flickr.com/photos/theblackstar/sets/72157626117942754/detail/

Basically we will be using the images that you have taken over the last few sessions in the photography studio and that you had added to your Blogger websites.
These images can also be selected and uploaded to your Edmodo accounts that we are using within this group.
The Edmodo system as you know is very similar to Facebook but secure and safe to use within the college, and will make the documentation of what you do within each session quicker to do.

During the session students will take photographs of sections of each other as per the example above. And then the images will be put through Lightroom to edit them quickly as a group.

The images that you have taken will be selected from the Lightroom software and uploaded into Edmodo. Lightroom software is only currently available on the studio computer as it can directly import and export studio images very quickly from a large groups work.

Thursday, 19 January 2012

Todays class

In this session you are required to round up all the images from the studio shoot you did on tuesday. The images need to go onto your blogs and written work needs to support these images.

Compare and contrast what you have done against images from research, if you haven't done that then carry on and do more research of other portrait photographers and add their images onto your blog.

Also you need to make sure that you are adding videos from Youtube that show these photographers at work or a documentary about them etc...

Also the amount of written work you do for images still applies to videos, don't just add videos in without and written work outlining your thoughts and ideas.


Tuesday, 17 January 2012

Studio Portraits in response to Research

This session is all about putting into practice what we have covered over the last few weeks, you should know how to use the lights and what attachments are available to you.

Research an image from the internet and get it onto the screen in the studio, together we will go through how the lighting is put together, but mainly it will be down to you to position the correct lighting and attachments in order to get close to the research photograph.

I will help to move the pantographs into position as the mechanism is prone to trap fingers so be careful and ask me to move the lighting. Also I will alter the lighting attachments for you as the flash tubes and bulbs can be very hot.

The photography this session will look at the variables that exist between one type of light and another in respect to the variety of different lighting attachments that can be used in the photography studio.
I will take on an observing role and will help you only if you require it, you must take the lead within this session.


Thursday, 12 January 2012

Blogs and Studio Sessions

In this session we will be looking at evidencing work onto your blogs from the 2 studio sessions we have done. I have all the images on my hard drive and I will put them onto the front computer, can you all come and collect your images and upload these onto your blogs. Don't forget to write about what you did, thoughts, ideas and continue with your research and development for the next session in the photography studio.

We did the still life session in which we looked at ISO, Shutter Speeds and Fstops (Apertures), you also need to make sure that you have a blog for each of these explaining fully what they mean with supporting images and videos from Youtube.

Use the images from your shoots to help explain these 3 variables, also you need to add blogs about the kit and equipment and in particular the use of flags (the large black fabric panels), what they do and what were they used for in the portrait session we did.

Also you need to look at Lightroom software and how post production using it can produce different effects and can allow quite quick choice and selection of images.

Tuesday, 10 January 2012

Low key Lighting

The session today will look at how to work with lower levels of lighting in the photography studio, we will look at how you can vary the amount of light reaching your subject. This is done via the use of different lighting attachments and flags to block light where it is not required.

The session will involve the use of the Canon 5d camera along with the studio lighting on the pantographs.
The theme will be Hollywood Lighting that has a use of what would of been strong continuous lighting, however we will be using Bowens Flash Lighting.

All images will be downloaded onto Lightroom via the studio computer and then a variety of different effects and styles will be looked at. The images will be used in the thursday session and blogs written with these images uploaded to help explain what you did. Each student will take 6 images of another in order to understand what it is like to be photographed as well as be the photographer.

Thursday, 5 January 2012

How to blog and what to include


Your research of the work of other photographers is a vital part of this process. It is the value that you identify from this that you are able to add to your own work and photography. For example you must see what clearly shows in their work from a range of about 6 of their photographs. These photographs you grab from the internet and upload to your blog. Then looking at these images you may see any of the following showing through as predominant throughout their work;

Composition, Colour, Shapes, Patterns, Lines, Tonal Range, Frames, Rule of thirds, Texture, Form, Focal Point, Perspective, Scale,  Denotation, Connotation, (literal and implied meanings)

Once you have used these words to help identify what value you can add to your own work. For example if one photographer uses colour, or patterns , or perspective in their work you could try adding this value into your own work.

For example the work of Rut Blees Luxemburg and her night time photography;


This image shows the use of colour, shape, lines, patterns, and also the deeper meanings of the aspirational artwork images of an ideal home within that community.


Whereas this image is more about composition and frames within frames, colour, scale, perspective, but also is a social comment on how people live stacked one upon the other.


Where this image is about colour, scale, viewpoint and perspective. Also it a social comment on how that for someone this is where they work as a car park attendant.


Where this image is about perspective born out the unusual vantage point, also the focal point, the vanishing point is also a critical part of how this image is constructed. Also colour is playing a part again along with lines and scale (such as the size of the cars).

Plus don't forget to include Youtube videos in your work, however if you put a video into your blog you must also put some written work underneath about analysis of it and any thoughts or ideas you may have  in response to it. Behind the scenes or documentaries are very useful insights into how people work and may give a good idea for what you could do when you do your portrait photography.


Welcome Back...

As mentioned before we have now finished the animation unit and we are now moving onto the photography one.
I will be finishing off looking at your animation work and I will be talking to people who may need to provide more work in order to pass the unit.
Each week we will be having workshops either in the studio or on location in order for you to become familiar with the kit and equipment, then it will be over to you to freely book cameras and the studio in order to produce your own work.